 i recently had the wonderful opportunity to spend an afternoon with some of my quilting friends. we gathered together at Cathy's house, and she showed us how to piece these blocks, Trip X Two. (and she and her husband also made us some amazing Italian wedding soup!)
these blocks are a smaller version of Trip Around the World. (the blocks finish around 15" square) they look more complicated than they actually are. i won't delude you into thinking that they are simple, however, the challenge of making these blocks is relatively easy to master.
so here goes! if you'd like to make these yourself you'll need 1/8 yard of 8 different fabrics to get started. (that will make you two blocks: one shaded light to dark, and the other shaded dark to light) any color combination will do, just make sure that the color changing is gradual, with no abrupt changes from one color/shade to the next.
i purchased all my fabrics at Joann's, and i must have walked up and down that wall of bolts 14 times! in the end, i did manage to find fabrics that i was pleased with- 16 different bolts worth! then i took them to the cutting table and asked for 1/4 yard of each. the cutting ladies just love it when we do that...
after you've purchased the fabric/rummaged through your stash, cut each of the 8 colors into 2, 2" strips. sew the strips together into two separate strip sets, graduating from light to dark. use a slightly longer stitch than you normally would, since we'll be ripping out some seams as we o along. but don't use a basting stitch- that's too long! (both strip sets will be exactly the same) then press: on one strip set press the seam allowance (SA) to the dark side. on the second strip set, press the SA to the light side. (sorry i don't have a picture of that)
then, separately, cut both strip sets into 2" strips. it's important to keep these 2" strips separate from each other. make 2 piles- one for the pieces with the SA going up, and the other for the SA going down.
now for the pictures!
 on your working surface, lay out the strips starting with the middle and then going down the sides, like an upside down V, staggering each strip down from the one before. (lay out 15 strips.) this block will be the one that shades from dark on the outside to light on the inside. pick first from your strip set with the SA going up, and then from the set with SA going down. alternate as you go. (this will ensure that your blocks go together nicely, as the SA will nestle right into each other, giving you accurately matching points.)
next, we're going to take off a portion of each strip set, to begin forming the first half of the block. don't do anything to the center strip. (number 8) on strips 7 and 9, take off one bottom block, (using a seam ripper). on strips 6 and 10, take off the 2 bottom blocks. on strips 5 and 11, take off the 3 bottom strips. continue this way until all the pieces are removed. now you can see the block beginning to take shape. although all the seams are sewn on the straight grain, the block is formed on the diagonal. (if that makes any sense at all...)

neatly stack all the pieces that you took off, and set them aside for the moment. you'll be using them later for the block that shades light to dark. sew the remaining strips together, using a 1/4" SA. (keep the bottom edges lined up.) do not press when you're done!
now for the other half...

line up another set of strip sets. (take from your pile of unused strips, not the ones you removed for the other half of the block) these strips are laid out much like the first half, only now the V is pointing down. lay out 13 strips, alternating the direction of the pressed SA. (center one down, next two up...)

again we're going to remove some of the blocks from each strip set. on the center strip (number 7) take off, using a seam ripper, the one lightest square. (that one is already in our block, on the other half) on strips 6 and 8, take off 2 squares. on strips 5 and 9, take off 3 squares. continue in this pattern...
stack the strips that you took off neatly to the side. you'll be using them in the light to dark square.

here you can visualize how the block is coming together. remember, you can double click on any of the pictures to make them larger. maybe that will help!
sew the bottom half of the block together, again using 1/4" SA. from the back, press the two halves, with one set of SA going one way, and the other half with the SA going the opposite way.

here you can visualize how the block is coming together. remember, you can double click on any of the pictures to make them larger. maybe that will help!

sew the bottom half of the block together, again using 1/4" SA. from the back, press the two halves, with one set of SA going one way, and the other half with the SA going the opposite way.
sew the block together, and press again.

tada!
you're done with the first block! and believe it or not, the second is MUCH easier, since you've already got most of the pieces prepped!

here I've laid them out on the table so you can see what it will look like. with the exception of 2 seams, i didn't have to do any ripping on this block! i just laid it out (using the piles that i had stacked neatly and set aside before) and then sewed it together.
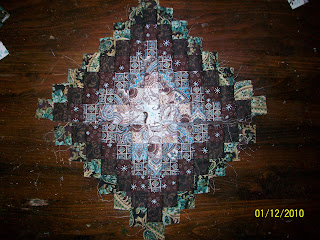
 here are the two companion blocks, laid out side by side. when you're ready to sew your blocks together, they get squared up to (15"?) the outer edges will be trimmed, allowing for a 1/4" SA to sew them together.

tada!
you're done with the first block! and believe it or not, the second is MUCH easier, since you've already got most of the pieces prepped!

here I've laid them out on the table so you can see what it will look like. with the exception of 2 seams, i didn't have to do any ripping on this block! i just laid it out (using the piles that i had stacked neatly and set aside before) and then sewed it together.
 here are the two companion blocks, laid out side by side. when you're ready to sew your blocks together, they get squared up to (15"?) the outer edges will be trimmed, allowing for a 1/4" SA to sew them together.
I'm very happy with how they turned out, and look forward to completing this quilt.
as soon as I'm done with some other projects that I'm working on, that is...

No comments:
Post a Comment